How To Download Code From Github To Visual Studio
This browser is no longer supported.
Upgrade to Microsoft Border to take advantage of the latest features, security updates, and technical support.
Tutorial: Open a projection from a repo
In this tutorial, you'll utilize Visual Studio to connect to a repository for the beginning time, clone it, and then open a projection from it.
If you haven't already installed Visual Studio, go to the Visual Studio downloads folio to install it for free.
Open a project from a GitHub repo
Visual Studio makes it piece of cake to open a project from a repo. You can do so when you beginning Visual Studio, or you can do so directly from within the Visual Studio IDE.
Here'southward how.
Use the outset window
-
Open up Visual Studio.
-
On the first window, select Clone a repository.

-
Enter or type the repository location, and then select the Clone push.

-
You might be asked for your user sign-in information in the Git User Data dialog box. You can either add your data or edit the default information information technology provides.

Select Save to add together the info to your global .gitconfig file. (Or, you tin select Cancel if you lot'd like to add the info later.)
View files in Solution Explorer
-
Next, Visual Studio loads the solution(s) from the repository by using the Folder View in Solution Explorer.

You can view a solution in Solution View past double-clicking its .sln file.
Or, you can select the Switch Views push, so select Plan.cs to view a solution'southward lawmaking.

Tip
The default view is set to Folder View. You tin change it to Solution View from the Git menu. Select Settings > Source Control > Git Global Settings > Automatically load the solution when opening a Git repository to do so.
Open up a project locally from a previously cloned GitHub repo
-
Open Visual Studio.
-
On the start window, select Open up a project or solution.
Visual Studio opens an instance of File Explorer, where you tin browse to your solution or project, and and then select it to open it.

Tip
If you've opened the projection or solution recently, select information technology from the Open contempo department to speedily open up it again.
Start coding!
Use the IDE
Y'all can too use the Git carte or the Select Repository control in the Visual Studio IDE to collaborate with a repository's folders and files.
Here's how.
To clone a repo and open a project
-
In the Visual Studio IDE, select the Git carte, and then select Clone Repository.

-
Follow the prompts to connect to the Git repository that includes the files you're looking for.
To open local folders and files
-
In the Visual Studio IDE, select the Git menu, select Local Repositories, and then select Open Local Repository.

Alternatively, you lot tin perform the same task from Solution Explorer. To do so, choose the Select Repository control, select the ellipsis icon that'south next to the Filter repositories box, and and so select Open Local Repository.

-
Follow the prompts to connect to the Git repository that has the files you lot're looking for.
Browse to an Azure DevOps repo
Here's how to browse to and clone an Azure DevOps repo past using Visual Studio.
-
Open Visual Studio.
-
On the start window, select Clone a repository.
-
In the Browse a repository section, select Azure DevOps.

-
Follow the prompts to clone an Azure DevOps repo that includes the files you lot're looking for, and then open your project.
Open a projection from a GitHub repo with Visual Studio 2019
How you open a project from a GitHub repo by using Visual Studio depends on which version you have. Specifically, if you've installed version Visual Studio 2019 version xvi.viii or subsequently, there's a new, more fully integrated Git experience in Visual Studio available to you.
But no thing which version y'all've installed, yous can always open a project from a GitHub repo with Visual Studio.
Visual Studio 2019 version sixteen.8 and after
Here's how to utilize Git in Visual Studio 2019 version sixteen.viii or later on.
Clone a GitHub repo and then open a project
-
Open up Visual Studio 2019.
-
On the showtime window, select Clone a repository.

-
Enter or blazon the repository location, and and so select Clone.

-
You might be asked for your user sign-in data in the Git User Information dialog box. You lot can either add your information or edit the default information it provides.

Select Save to add together the info to your global .gitconfig file. (Or, y'all can select Abolish if you'd similar to save the info afterwards.)
Next, Visual Studio automatically loads and opens the solution from the repository.

-
If your repository contains multiple solutions, Solution Explorer displays them. For a listing view of the solutions, select the Switch Views button in Solution Explorer.

Solution Explorer then gives you lot the option to open up the root folder in Folder View or to select a solution file to open.

To toggle the view, select the Switch Views push button over again.
Tip
You can as well utilize the Git menu in the Visual Studio IDE to clone a repo and open a project.

Open a project locally from a previously cloned GitHub repo
-
Open Visual Studio 2019 version 16.eight or subsequently.
-
On the start window, select Open up a projection or solution.
Visual Studio opens an example of File Explorer, where y'all tin browse to your solution or project, then select it to open information technology.

If you've opened the projection or solution recently, select it from the Open recent section to chop-chop open it again.
Tip
You tin also use the Git menu in the Visual Studio IDE to open local folders and files from a repo that y'all've previously cloned.

Starting time coding!
Visual Studio 2019 version 16.vii and earlier
Hither's how to use Git in Visual Studio 2019 version 16.7 or earlier.
Clone a GitHub repo and and then open a project
-
Open Visual Studio 2019 version 16.7 or before.
-
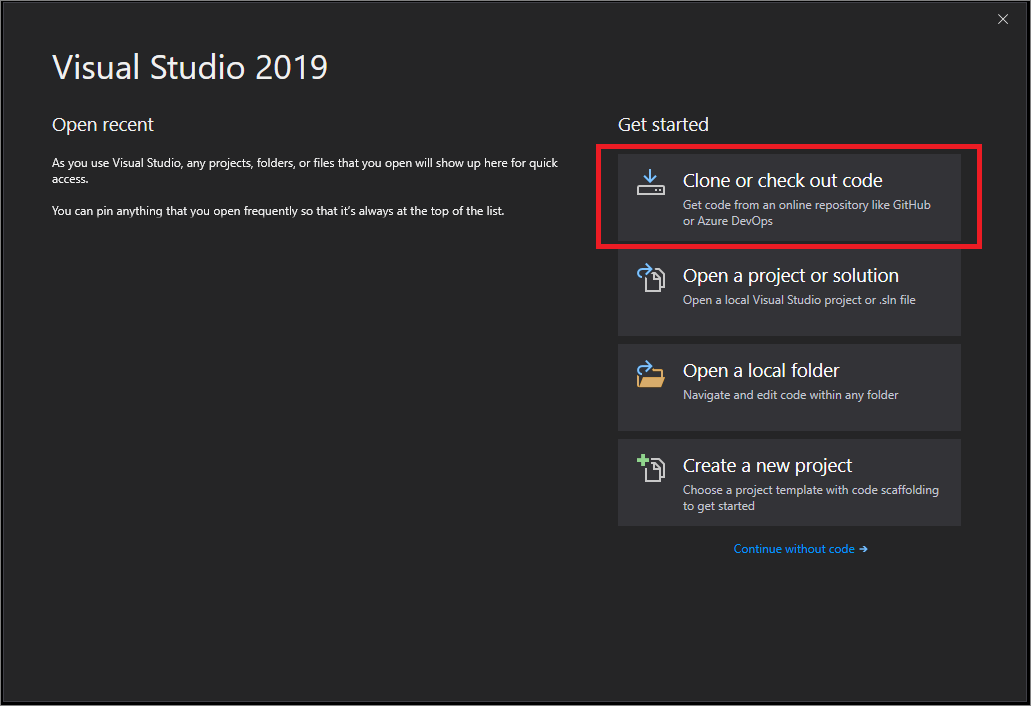
On the get-go window, select Clone or check out code.
-
Enter or type the repository location, and then select Clone.
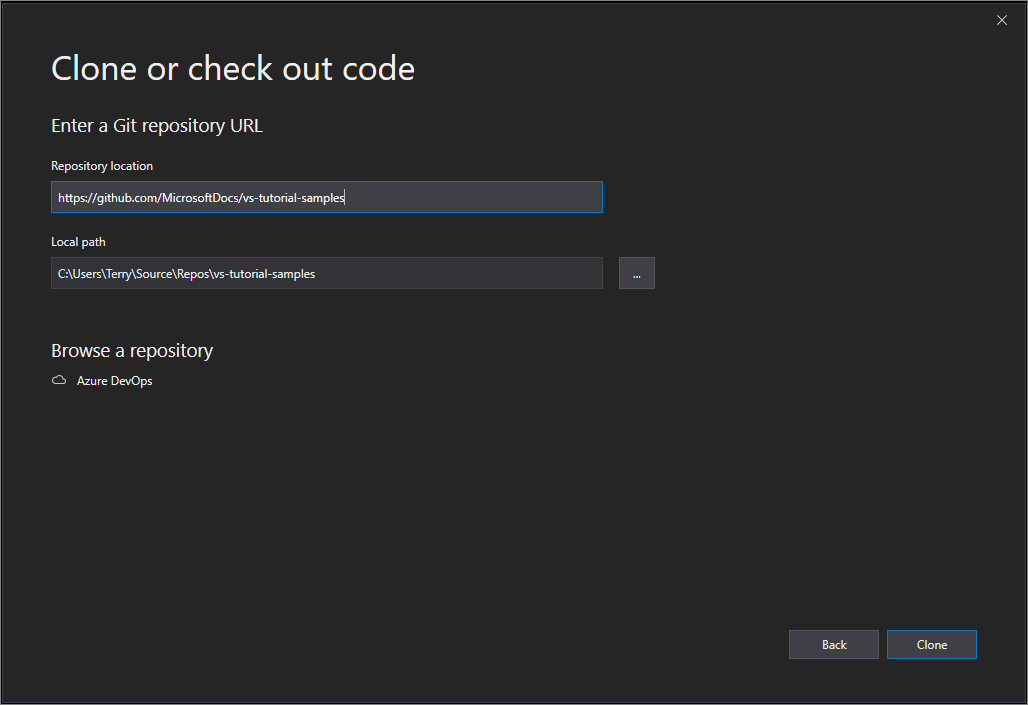
Visual Studio opens the project from the repo.
-
If you lot have a solution file available, it appears in the "Solutions and Folders" fly-out carte. Select it, and Visual Studio opens your solution.
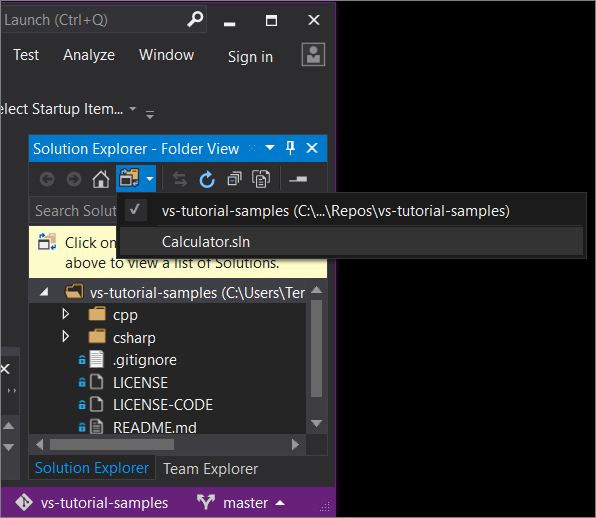
If yous do not accept a solution file (specifically, an .sln file) in your repo, the fly-out menu says "No Solutions Constitute." However, y'all can double-click any file from the binder card to open it in the Visual Studio code editor.
Commencement coding!
Browse to an Azure DevOps repo with Visual Studio 2019
What you encounter when you browse to and clone an Azure DevOps repository past using Visual Studio 2019 depends on which version you have. Specifically, if y'all've installed version version 16.eight or later, we've inverse the UI to arrange a new, more than fully integrated Git feel in Visual Studio in Visual Studio.
Merely no matter which version you take installed, you can e'er browse to and clone an Azure DevOps repo with Visual Studio.
Visual Studio 2019 version xvi.8 and subsequently
-
Open Visual Studio 2019 version xvi.8 or later.
-
On the start window, select Clone a repository.
-
In the Browse a repository section, select Azure DevOps.

-
If you lot meet a sign-in window, sign in to your account.
-
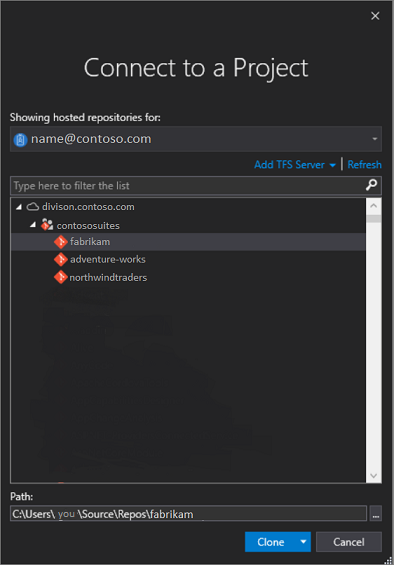
In the Connect to a Projection dialog box, cull the repo that you desire to connect to, and then select Clone.

Tip
If y'all don't see a pre-populated listing of repos to connect to, select Add Azure DevOps Server to enter a server URL. (Alternatively, y'all might meet a "No servers found" prompt that includes links to add an existing Azure DevOps Server or to create an Azure DevOps business relationship.)
Next, Visual Studio opens Solution Explorer that shows the folders and files.
-
Select the Team Explorer tab to view the Azure DevOps deportment.

Visual Studio 2019 version 16.7 and earlier
-
Open Visual Studio 2019 version sixteen.7 or earlier.
-
On the first window, select Clone or bank check out code.
-
In the Browse a repository section, select Azure DevOps.
If you see a sign-in window, sign in to your business relationship.
-
In the Connect to a Project dialog box, choose the repo that you want to connect to, and then select Clone.
Note
What you see in the list box depends on the Azure DevOps repositories that you have access to.
Visual Studio opens Team Explorer and a notification appears when the clone is complete.
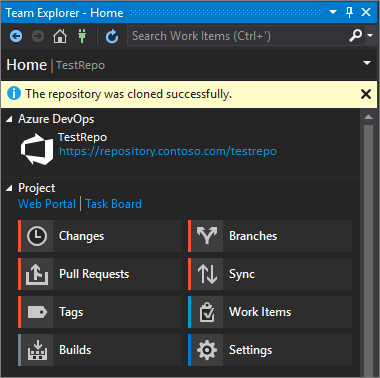
-
To view your folders and files, select the Show Binder View link.
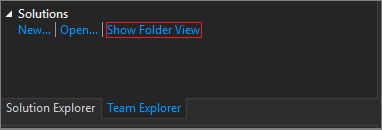
Visual Studio opens Solution Explorer.
-
Choose the Solutions and Folders link to search for a solution file (specifically, an .sln file) to open up.
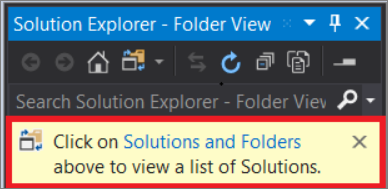
If you exercise not have a solution file in your repo, a 'No Solutions Institute' message appears. Nonetheless, you can double-click any file from the folder menu to open up information technology in the Visual Studio code editor.
Open a project from a GitHub repo with Visual Studio 2017
-
Open Visual Studio 2017.
-
From the superlative carte du jour bar, select File > Open > Open from Source Command.
The Squad Explorer - Connect pane opens.

-
In the Local Git Repositories section, select Clone.

-
In the box that says Enter the URL of a Git repo to clone , type or paste the URL for your repo, and then press Enter. (You might receive a prompt to sign in to GitHub.)
Subsequently Visual Studio clones your repo, Team Explorer closes and Solution Explorer opens. A message appears that says Click on Solutions and Folders above to view a listing of Solutions . Choose Solutions and Folders.

-
If you lot have a solution file available, it appears in the "Solutions and Folders" wing-out menu. Choose it, and Visual Studio opens your solution.
If you do not have a solution file (specifically, an .sln file) in your repo, the fly-out menu says, "No Solutions Constitute." However, yous can double-click any file from the folder menu to open up information technology in the Visual Studio code editor.
Review your work
View the following animation to check the piece of work that you completed in the previous section.

Open up a project from an Azure DevOps repo with Visual Studio 2017
-
Open up Visual Studio 2017.
-
From the top menu bar, select File > Open > Open from Source Control.
The Team Explorer - Connect pane opens.
-
Hither are two ways to connect to your Azure DevOps repo:
-
In the Hosted Service Providers department, select Connect....

-
In the Manage Connections driblet-downward list, select Connect to a Project....

-
-
In the Connect to a Project dialog box, choose the repo that y'all want to connect to, and then select Clone.
Note
What you encounter in the listing box depends on the Azure DevOps repositories that you have access to.
-
After Visual Studio clones your repo, Team Explorer closes and Solution Explorer opens. A message appears that says Click on Solutions and Folders in a higher place to view a list of Solutions. Choose Solutions and Folders.
A solution file (specifically, an .sln file), appears in the "Solutions and Folders" wing-out menu. Cull information technology, and Visual Studio opens your solution.
If you do not have a solution file in your repo, the wing-out menu says, "No Solutions Found". All the same, you can double-click whatever file from the folder carte to open it in the Visual Studio code editor.
Next steps
Feel free to dive into any of the following language-specific tutorials:
- Visual Studio tutorials | C#
- Visual Studio tutorials | Visual Bones
- Visual Studio tutorials | C++
- Visual Studio tutorials | Python
- Visual Studio tutorials | JavaScript, TypeScript, and Node.js
Encounter besides
- The Git experience in Visual Studio
- Compare Git and Team Explorer side-by-side
- Microsoft Acquire: Become started with Git and GitHub in Visual Studio
- Microsoft Learn: Become started with Azure DevOps
- Azure DevOps Services: Get started with Azure Repos and Visual Studio
Feedback
DOWNLOAD HERE
Posted by: leepersupuldn1946.blogspot.com